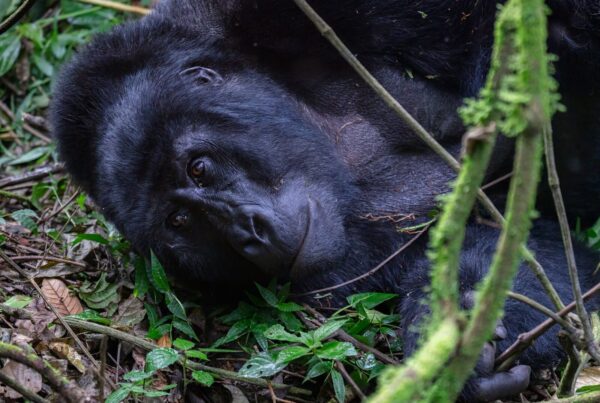
Photographing the Most Difficult Wildlife Encounter
Gorilla trekking photography is among the most technically challenging wildlife photography situations — dense forest shade requiring high ISO, fast-moving subjects that may be partially obscured by vegetation, no flash permitted, and the emotional intensity of the encounter creating pressure that can interfere with calm technical execution. Yet the photographs from a successful gorilla trekking shoot are among the most powerful wildlife images a photographer can produce: the scale, intelligence, and expressiveness of mountain gorillas create compositions that resonate in ways that other wildlife photographs cannot. This guide covers the equipment, settings, and field techniques that produce the best results in Bwindi’s challenging conditions.
Understanding the Light at Bwindi
The fundamental challenge of gorilla trekking photography is light. Bwindi’s forest canopy reduces available light dramatically compared to open habitats — even on sunny days, the light level under the canopy is equivalent to indoor lighting or deep shade. Most gorilla encounters occur in this reduced-light environment, requiring camera settings that would be unnecessary in open savannah photography.
Measure the available light accurately before assuming what settings you need: on some days, encounters occur in clearings, bamboo stands, or forest edges where better light makes high ISO unnecessary. On other days, the gorillas are deep in canopy shade where even ISO 3200 or higher may be required for usable shutter speeds. The variability means you need equipment capable of performing well across the full range of conditions.
Camera Equipment Recommendations
DSLR or mirrorless cameras with full-frame or APS-C sensors perform significantly better in low light than compact cameras or smartphones, due to their larger sensor size and resulting better high-ISO performance. If you have access to a modern mirrorless camera (Sony A7 series, Nikon Z series, Canon R series) or a DSLR with strong high-ISO capability (Canon 5D series, Nikon D series), bring it.
Lens selection is critical. A fast lens (maximum aperture f/2.8 or wider) allows shooting at lower ISO and faster shutter speeds for the same light level compared to slower kit lenses (f/5.6). A 70-200mm f/2.8 zoom is the ideal gorilla trekking lens — the focal length range covers full-body gorilla shots at typical encounter distances (7 to 20 metres) and allows tight head portraits and face shots, while the f/2.8 aperture provides meaningful low-light advantage. A 24-70mm or 24-105mm zoom is useful for environmental shots that include forest context alongside the gorillas.
If you only have a kit zoom (typically f/3.5 to 5.6), it will still produce usable results but requires higher ISO and may limit shutter speed in the darkest conditions. Ensure your lenses are clean and functional before the trek — mist and humidity affect lens and camera performance.
Camera Settings for the Forest
The fundamental exposure challenge at Bwindi is balancing three variables: ISO (sensor sensitivity), aperture (lens opening), and shutter speed (how long the sensor is exposed). In the gorilla encounter context, the priorities are:
Shutter speed: prioritise a minimum of 1/125 second (ideally 1/200 or faster) to freeze gorilla movement and reduce camera shake. Gorillas move unpredictably and faster than their apparent bulk suggests. Slow shutter speeds produce motion blur that ruins otherwise excellent images.
Aperture: use your widest available aperture (lowest f-number) to admit maximum light. With a zoom lens at f/2.8, this is optimal. With a kit lens at f/5.6 at the long end, you have less flexibility.
ISO: set ISO high enough to achieve the target shutter speed at your chosen aperture. Modern cameras produce usable images at ISO 1600 to 3200; some excellent cameras (Sony A7 series, Nikon D850) produce good results to ISO 6400 or beyond. Do not be afraid of high ISO — a sharp image at ISO 3200 is far better than a blurry image at ISO 400.
Use auto-ISO with a minimum shutter speed set to 1/125 or 1/200: this setting (available on most modern cameras) lets the camera automatically raise ISO to maintain your target shutter speed as light decreases, freeing you to concentrate on composition and timing rather than constant manual adjustment.
Autofocus for Gorillas
Modern mirrorless cameras with animal/eye autofocus track gorilla faces and eyes automatically, producing sharp portraits with minimal manual focus intervention. If your camera has this feature, enable it — the success rate for sharp gorilla portraits is dramatically higher with animal AF than with manual or zone AF.
For cameras without animal tracking AF, use continuous AF (AI Servo on Canon, AFC on Nikon and Sony) with the central focus point to track individual gorillas. Anticipate focus jumps to background vegetation — if the gorilla moves, the AF may briefly lock onto nearby leaves or branches. Manual focus override using focus-by-wire is an option for experienced photographers who can focus quickly.
Composition and Storytelling
The most memorable gorilla photographs go beyond the single portrait to tell a story: a mother and infant, a silverback’s gaze, a juvenile’s play, the family group in forest context. Use the full hour deliberately — don’t spend all 60 minutes shooting the same silverback composition. Look for interactions between individuals, for moments of behaviour (grooming, feeding, play, resting), for frame-within-frame opportunities using vegetation, and for environmental shots that convey the forest setting.
The 7-metre distance rule creates a minimum working distance that affects composition: at 7 metres with a 200mm lens on a full-frame camera, a gorilla fills roughly half the frame. At 7 metres with a smartphone, the gorilla is a small figure in a wide frame. Know your equipment’s reach at 7 metres and plan your focal length accordingly.
Practical Field Tips
Arrive at the gorilla encounter with your camera settings already optimised — set your ISO, check your shutter speed, and confirm your focusing mode before you leave the trailhead. In the excitement of first spotting the gorillas, there is no time to adjust unfamiliar camera settings.
Protect your camera from rain with a waterproof cover or rain sleeve — Bwindi rain begins without warning and a wet camera can be quickly damaged. Bring a microfibre cloth in your jacket pocket for wiping lens and camera surfaces when moisture collects. Carry extra batteries (cold temperatures and high-ISO shooting drain batteries faster) and extra memory cards in a waterproof bag.
Use your elbows or a nearby tree as a stabilising rest when shooting in low light — even with image stabilisation, a physical rest point reduces camera shake and improves sharpness at the shutter speeds required in forest light.
Smartphone Photography
Modern flagship smartphones (iPhone Pro models, Samsung Galaxy Ultra) produce surprisingly good gorilla photographs in adequate light, with computational photography compensating for optical limitations. Their advantages are compact size, constant-on availability, and ease of sharing. Their limitations are significant in low light (slower performance than dedicated cameras with fast lenses) and at longer distances (digital zoom degrades image quality rapidly). If a smartphone is your primary camera, ensure it is fully charged, protected from rain, and that you understand its manual or pro mode settings for low-light situations.
Video for Gorilla Encounters
Video of the gorilla encounter is among the most compelling personal wildlife footage a traveller can produce. Modern mirrorless cameras and flagship smartphones produce excellent 4K video that captures the sounds of the forest — the silverback’s vocalisations, the movement through undergrowth, the proximity of the animals — in ways that still photography cannot. Set your video recording mode before the encounter begins and switch between stills and video deliberately rather than trying to manage both simultaneously throughout the hour. Stabilisation is critical for video — use in-camera optical stabilisation and avoid pan movements unless very smooth.
Final Thoughts
Gorilla trekking photography rewards preparation and calm technical execution under emotional pressure. The hour passes quickly — you will use it better if your equipment is ready, your settings are optimised, and you have thought about what kinds of images you want before the encounter begins. The photographs you bring home from Bwindi will be among the most meaningful in your archive. Give them the technical attention they deserve.
Frequently Asked Questions
A versatile zoom lens in the 24–200mm range (or equivalent on crop sensor) works for most forest conditions. A fast lens (f/2.8) handles the low light under the forest canopy. Mirrorless cameras with fast autofocus track gorilla movement well. Flash is strictly prohibited. Bring a rain cover — the forest is damp year-round.
Set: Shutter priority at minimum 1/250s (to freeze movement), Auto ISO with a ceiling of 6400, continuous autofocus, burst mode. Shoot in RAW for post-processing flexibility. In the dense understorey, light is limited — prioritise shutter speed over aperture. Wide-angle shots require patience as gorillas occasionally approach very close.
UWA guidelines require a minimum 7-metre distance from gorillas at all times. In practice, gorillas regularly approach the human group on their own — rangers manage this by repositioning the group when needed. Most trekkers end up photographing gorillas at 3–10 metres. Infant gorillas sometimes approach even closer, which rangers discourage gently.
Yes — video cameras and smartphone video are permitted. Flash is the only restriction. A monopod is useful for steadier video in low light. If you plan serious video work (wildlife documentary standard), consider the Gorilla Habituation Experience ($1,800) which gives 4 hours to film natural behaviour in a smaller group of just 4 visitors.
Uganda is home to the mountain gorilla (Gorilla beringei beringei), one of two subspecies of eastern gorilla. They live exclusively in the Virunga volcanic highlands (Uganda/Rwanda/DRC) and Bwindi Impenetrable Forest (Uganda only). Mountain gorillas are the only gorilla subspecies that cannot survive in captivity — every individual you can trek is a wild animal.