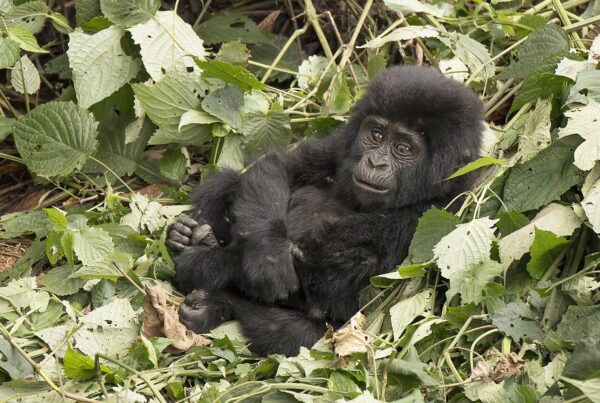
Still photography has dominated the conversation about gorilla trekking camera craft—and understandably so, since a single frame can define a memory. But for many travellers, video is the medium that best captures what the gorilla encounter actually feels like: the sounds, the movement, the spatial relationships within the family group, the approach of a curious juvenile toward the camera, the silverback’s chest beat heard as well as seen. Video from a gorilla encounter done well is among the most powerful wildlife footage a non-professional can produce. Done poorly, it produces shaky, dark, noisy clips that convey none of the experience. The difference lies almost entirely in preparation and technique.
Camera choices for gorilla video
Any modern mirrorless camera with 4K video capability—Sony A7 series, Canon R series, Nikon Z series—is capable of producing outstanding gorilla footage in the right conditions. Dedicated video cameras (Sony FX series, Blackmagic Pocket Cinema Camera) offer additional codec and colour science advantages but at the cost of size, weight, and the need for dedicated video expertise. For most trekkers whose primary capture is stills with video as a secondary priority, a capable mirrorless body in video mode is the practical choice. Smartphones—particularly the current generation of flagship iPhone and Android devices—are genuinely capable video cameras in decent light, with image stabilisation and computational photography that makes handheld forest video substantially more watchable than earlier generations. They are also small, light, and less socially conspicuous than large camera systems, which matters in the quiet intimacy of the gorilla encounter.
Stabilisation: the single most important factor
Shaky video is the characteristic failure mode of wildlife footage shot without stabilisation. After a physical trek through steep forest, your hands are not steady—even if they feel stable to you, the camera will reveal micro-tremors that degrade video quality significantly. The solution has multiple layers: in-body image stabilisation (IBIS), which most current mirrorless cameras provide; lens-based optical stabilisation (OS/OIS), available in most modern telephoto zooms; and post-processing stabilisation in editing software (Premiere Pro, Final Cut, DaVinci Resolve all have competent warp stabiliser tools). The best single intervention for hand-held forest video is the combination of IBIS and OIS—which together can reduce effective shutter tremor by five or more stops. For telephoto focal lengths (100–400mm range), even this combination may not fully compensate for physical fatigue-induced movement; a monopod or a solid tree branch as a support point improves stability dramatically.
Exposure settings for dark forest video
The standard videography exposure rule is to set shutter speed to approximately twice the frame rate—shooting at 25fps means a shutter speed of 1/50s, shooting at 30fps means 1/60s. This creates natural motion blur that gives video its characteristic smooth look. In Bwindi’s dark forest interior, maintaining these shutter speeds while achieving correct exposure requires high ISO settings—typically ISO 2000–6400 on a capable mirrorless body. Modern sensors handle these ISOs with acceptable noise levels for 4K delivery, but you need to verify your camera’s ISO performance before relying on it. The alternative—raising ISO further to allow a faster shutter speed—produces over-sharpened, stuttery motion that is visually unpleasant. Use the shutter-speed-to-frame-rate rule as your starting point and push ISO as high as your camera’s noise performance allows.
Audio: the overlooked dimension
The built-in microphones on camera bodies are generally inadequate for wildlife video—they pick up wind, handling noise, and ambient electronic hum in addition to the actual sound of the environment. For gorilla encounter video, the most impactful audio upgrade is a small on-camera directional microphone (Rode VideoMicro or similar) that attaches to the hot shoe and significantly improves directionality and wind rejection relative to built-in mics. The sounds of a gorilla encounter—the tearing of vegetation as the family feeds, the silverback’s low rumble, the contact calls of juveniles, the rustle of bamboo as the group moves—are acoustically extraordinary, and capturing them well transforms the video from a visual record into a sensory document. Test your audio setup before the trip; forest acoustics are different from urban environments and some microphones that perform well indoors produce poor results in the complex, reverberant soundscape of a dense forest.
Movement: when to pan and when to hold
The instinct when filming moving animals is to follow them with continuous panning—the camera swinging to track as the subject moves. This produces footage that is difficult to watch at speed and that places constant demand on the viewer’s spatial orientation. A more effective technique is to hold the frame for a complete beat, allow the subject to move through it and exit, then deliberately reframe for the next position. This “hold and reframe” approach produces footage that has visual rhythm—a series of composed shots rather than an endless tracking pursuit. It also allows the sound of the environment to be captured during the hold, giving the footage natural pauses that give the viewer room to breathe. Save the continuous tracking for moments of dramatic action—the silverback moving at speed, a juvenile chasing another through undergrowth—and let the holds carry the quieter moments.
Managing the still-video tension
Many trekkers attempt to both photograph and film during the gorilla hour, switching between modes as opportunities arise. This is possible but requires deliberate management—the cognitive load of operating in two modes simultaneously can result in mediocre performance in both. A cleaner approach is to divide the hour: spend the first 20 minutes filming video with the camera in video mode (or a dedicated video device); spend the next 30 minutes shooting stills; and keep the final 10 minutes camera-free for presence and observation. Some trekkers bring two devices—a dedicated video camera or smartphone for footage, a mirrorless body for stills—which eliminates mode-switching entirely. The rule of thumb: whichever medium matters most to you, start with it. You are always freshest in the first 15 minutes of the encounter, and that is when the gorillas are most likely to be in an optimal position before they settle into feeding or move deeper into cover.
Editing: what to cut and what to keep
Raw gorilla footage is almost never watchable at full length—the good moments are embedded in long periods of camera motion, searching, and dark underexposed frames as you moved from one position to another. The editing process is where the experience becomes a story. Keep: moments of direct eye contact between gorilla and camera; feeding behaviour with good audio; movement through open forest with clean sight lines; any interaction between family members (play, grooming, chest beats); and the ambient forest sound that establishes the environment. Cut: moments of searching and tracking before the subjects are visible; periods of extreme camera motion; dark and blurry frames; long stretches of static subjects that add no new information. A tight three to five minute edit of a gorilla encounter, cut to its essential moments with the forest audio underneath, is vastly more powerful and watchable than twenty minutes of raw footage. Less is always more.
- Black & White Photography Techniques to Try on a Gorilla Safari
- While the World Watches the War, These Travellers Are Quietly…
- Gorilla Trekking Safety: What Your Guides Keep Watch For
- Gorilla Trekking and Birdwatching in Bwindi: Combining Passions
- Uganda Safari Documentaries: What to Watch Before Your Trip
- Gorilla Trekking Photography: Camera Settings and Tips for Bwindi
- Gorilla Trekking and Birdwatching: Uganda’s Premier Wildlife Combination
- Watching a Silverback Discipline His Family: Raw Power and Love Together
- The 6 Best Gorilla Trekking Videos on YouTube Right Now
- The Viral Gorilla Video That Got 50 Million Views: What Really Happened